

If you are looking for How To Build An Outdoor Pizza Oven, read on. Building an outdoor pizza oven is a great way to spend your free time. An outdoor pizza oven is an excellent addition to any backyard. It can be used to cook pizzas for the whole family, or you could use it as a grill.
The best part about an outdoor pizza ovens is that they are easy and inexpensive! This blog post will show you how to build one with supplies from your local hardware store.
It’s also an excellent way to host family gatherings. But, you have to plan for this project so it can be completed in one day–or at least over the weekend. This blog post will help you with that!
Contents
What is an outdoor pizza oven?
An outdoor pizza oven is an oven made out of brick and mortar. They can be used to cook pizzas, bread, meats, and other foods! Usually, people build their outdoor pizza ovens because they prefer cooking with wood or charcoal rather than using a standard kitchen stove, which uses gas or electricity.
Some even build outdoor pizza ovens to earn money by catering for parties for friends and family. There are several plans available on the internet that you can use to make your brick oven; however, these plans usually require that you purchase them (for around $10).
If you already have some building experience, it might be fun to challenge yourself by trying one of these DIY Outdoor Pizza Oven Plans. Or, if you would like to do something different, here is how to build an outdoor pizza oven for under $100.
Now I know what you are thinking. You don’t want to spend another second reading this blog post because every minute that goes by is a precious moment without your new outdoor pizza oven! However, before you run off to the backyard with bricks and mortar in hand, there are some things you should keep in mind first.
Now, if it’s your first time building an outdoor pizza oven, then you might consider getting someone experienced to help you out.
This way, there will be less room for error–and mistakes can be very costly! If not, make sure that this project has been cleared with whoever owns the property where your newly-minted brick masterpiece will be located.
An outdoor pizza oven can take a few days to build from start to finish. So, you will have plenty of time to find the perfect location for it! Also, make sure you have a place for all those yummy pizzas your new brick oven is going to cook up!
Just think about how many pizzas you and your friends or family will eat in a month–that’s how much space you should give this project! Set aside enough room for the building materials and the finished structure of your outdoor pizza oven.
To save on materials and money, consider finding free or cheap supplies such as stone blocks, bricks, mortar mix, sand, and water. Also, if you know someone who works with masonry, they might be willing to give you some supplies for free. Just don’t forget to thank them once the project is complete!
You can find yourself the best pizza oven here!
Why should you make your outdoor pizza oven?
Outdoor pizza ovens are not just for pizzas! You can cook all kinds of delicious food and desserts inside your outdoor pizza oven.
An outdoor brick oven is an excellent addition to any backyard or patio. If you would like, you could even put it right on the deck! It adds style and class to any backyard. Your friends will be so impressed with this homemade Mediterranean-style brick oven that they’ll never want to leave!
You’ll feel like the master of the grill once you master cooking in your outdoor wood-fired/charcoal brick fire pizza oven.
You don’t need other equipment such as propane tanks, charcoal grills, or other modern inventions for cooking tasty food–just an open flame from either wood or charcoal will do. You can use it for any barbeque or cookout!
The benefits of making your outdoor pizza oven
You can make homemade pizza in only a couple of minutes with this easy-to-use apparatus! It’s healthier than frying or baking your pizzas in the oven, plus you have more freedom to experiment with creating toppings. Just think about how much fun you’ll have experimented with new recipes for cooking pizza!
Every party needs good food–and if you are planning an outdoor party, then it is best to serve foods that are made on the spot, so people don’t get full before the main course arrives!
The best thing about making this type of food is that it tastes delicious, and people will love being able to watch their meal being cooked right in front of them. You could even teach them how they too can cook up these unique dishes at home!
Remember that homemade pizza is not just great for parties. It’s also a healthier alternative to buying take-out pizza or processed frozen pizzas.
Who knows, maybe this will encourage you and your family to eat more nutritious meals! Cooking with fresh ingredients always tastes the best–and it doesn’t get any newer than when you cook in your outdoor brick oven!
How to build an outdoor pizza oven?
Your outdoor pizza oven doesn’t have to be outside either. You can even make one for your kitchen! People often enjoy cooking their pizzas in brick ovens because you can cook food at a lower temperature, which is healthier and tastier.
Now that you’ve decided on the benefits of having an outdoor brick oven, it’s time to get started building your first ever homemade brick oven! You might ask yourself:
How? Where do I begin? For those of you who are just beginning, we will cover all the basics here so you can build a tremendous homemade wood-fired pizza oven that will last for years and years. It isn’t as hard as it may seem once you know what to do! So let’s get building!
What you will need to construct an outdoor brick oven:
Durability -The first thing you’ll want to keep in mind is the durability of the materials. Make sure your structure is solid enough so it will last for several years. You may even want to build more than one, so you can experiment with different designs and layouts.
It’s always good to have a backup plan because accidents happen–and there’s nothing worse than not being able to use the backyard oven because it crumbled from old age! So as a beginner, don’t be too ambitious as this will only lead to confusion and ultimate failure.
Temperature resistance -Having strong temperature resistance is essential as well. If you’re going for a traditional-style brick oven, then you will need to look into getting refractory cement.
This is the material that will withstand the heat from your flames and cook your food just as hot as it would be inside a traditional brick oven! If you plan on cooking pizza in an outdoor setting, then this is especially important.
Building materials -One of the best building materials for this type of project is ceramic blocks because they are so easy to work with and yet still durable enough to last through many years of wear and tear.
As we mentioned, you can use refractory cement if you want a more traditional brick oven design, but better yet, try using clay bricks which come in all sorts of fun shapes and sizes perfect for making unique designs. The sky’s the limit!
Ratio of ingredients -Another essential factor to consider is the ratio of ingredients you will need. The most common mixture for making brick ovens is a 1:3 ratio. This means that if you mix six parts sand, three parts clay, and two parts water, you would need 18 parts in total.
Of course, this depends on how much material your structure requires–, but it’s always best to overestimate than underestimate when building!
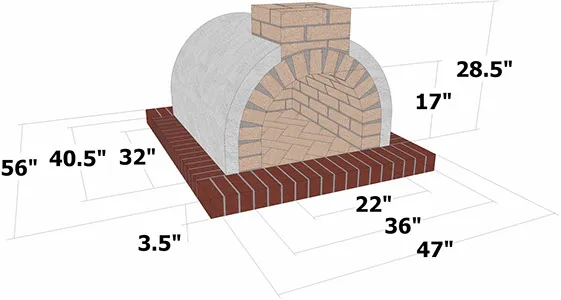
Workspace -You will also want to choose an area with ample room where you can build your homemade outdoor brick oven. Take into consideration both the height and length measurements so that everything fits perfectly inside the space provided.
Make sure there are no obstacles around, such as trees or fences that you will need to cut down–or other types of materials such as cement blocks, rocks, and metal, which could potentially cause problems if they get in the way during construction.
Practice makes perfect -As with anything, though, the more you practice, the better you become! So, if your first brick oven doesn’t come out as planned (which is perfectly normal), don’t give up hope!
There are many resources available online for this type of project, including instructional videos on YouTube, which can help you learn new tricks along the way. Make sure to take pictures every step of the way so you can document your journey towards making an outdoor brick oven that will last a lifetime.
Now that you know everything there is to know about how to construct an outdoor brick oven let’s get started!
Essential Outdoor Brick Oven Designs
Firepit design -The fire pit design is one of the most popular choices because it offers complete freedom when designing. You can make different levels by using bricks or stones in different shapes and sizes–even using clay plates if you want a more rustic feel to your oven.
It’s entirely up to you! This type of setup also makes it easy to change out the kindling inside so that you can cook all sorts of dishes with just one single homemade outdoor brick oven. Some people even go so far as to add stainless steel grating on top for extra strength. The possibilities are endless with this style!
Freestanding design -Another type of outdoor brick oven design is the freestanding style. You can build these types to fit just about any space, and there are many ways you can go about it.
For example, if you’re working with a large area, you can use bricks or stones to create a base and walls for your homemade brick oven–but if you want something more permanent, then using cement blocks and mortar would be best.
Just make sure not to use metal grating in this case because it will heat up quickly and might melt through the gaps!
Upside down dome design -The upside-down dome design is one of the simplest yet most effective styles. This can be done by digging out an area that acts as your base and internal oven space.
You can also use the same steps as the freestanding style to create a box-like structure around your oven, so it doesn’t collapse–but this will require a little more work.
Then coat the entire surface with refractory cement before adding bricks or clay tiles all around to form an upside-down dome shape that is half-buried into the ground.
Inverted pyramid design -The inverted pyramid is yet another popular choice for those who enjoy making unique kinds of homemade brick ovens as it allows for large amounts of food to be cooked inside at one time.
This type of outdoor brick oven works excellent when making pizzas but might not be good if you plan on cooking lots of vegetables since they tend to get burned more efficiently. That being said, it does have a lower risk of overheating, so if you’re using firewood for cooking with then, this style will probably work best for you.
Square design -The square format is suitable for making bread or even meat because it allows heat to circulate through the oven, which helps keep things from burning while cooking.
This outdoor brick oven is also great for grilling since there’s plenty of room inside and comes with a small door in the front that locks shut while cooking. This reduces heating the surrounding area and keeps all the odors from leaking out.
Rectangular design -The rectangular design offers an extensive range of options for cooking because the flaps can be used for grilling, keeping food warm, or even making a small stove to boil water in.
This type of homemade brick oven also comes with a large door that can open completely when you need maximum heat, making it easy to add firewood during the cooking process. With this style, you’ll be able to cook all types of dishes, from appetizers to desserts and everything else in between!
Spiral staircase design -The spiral staircase design is excellent when making brick ovens for outdoor use because it gives you extra space if your yard is limited on both height and width.
The only downfall is that not many people want to climb upstairs just so they can prepare their meal, but if you like this kind, then there’s no harm in giving it a try.
Custom designs -The sky is the limit when it comes to making homemade brick ovens, and if you enjoy this kind of DIY project, then you can even create your unique designs with bricks, stones, or clay tiles.
Even though most people tend to stick with the basic styles offered above, sometimes having something different truly adds to the overall ambiance and charm of your backyard–especially when company comes over!
Now that we’ve covered some helpful tips and advice on making homemade brick ovens for outdoor use, there’s one thing left to do… Listed below is the complete step by step instructions you’ll need when creating yours at home:
Choose a Location for Your Pizza Oven
- Make sure it’s not in the front yard
- Don’t place it under trees with big branches
- Stay away from too much direct sunlight
TIP: Always choose a location near your house with easy access to electricity just in case you need to use extra power to keep everything running smoothly.
If you’re planning on cooking huge meals and hosting barbecues, try placing the oven towards the back of your property because it can get deafening–especially if you like experimenting with different kinds of wood!
Step 1: Gather all materials and tools needed for this project.
-Bricks (standard size if possible) -Fire bricks work great when making ovens that can handle extremely high temperatures.
Still, they’re typically expensive and heavy, so it’s not recommended to use them for this kind of outdoor brick oven. For most cases, you’ll need standard-sized bricks–not the thin ones since they won’t stand up to heat as well.
-Cement mix or refractory cement -In the event, you have a limited budget. You might want to choose a cheaper option by using a cement mix instead of buying refractory cement, which is specially designed for baking pizzas and bread in outdoor brick ovens do keep in mind that this option won’t last as long when exposed to high temperatures.
-Water-Water is needed for this project because it helps the cement mix stick together when you’re making brick ovens that are built into the ground. Without it, your outdoor concrete oven will end up crumbling apart over the years, which reduces the lifespan significantly.
-Bucket -This type of homemade brick oven requires quite a bit of water so having a good bucket on hand is very important when avoiding messes and spills.
You’ll need space in your backyard or patio area to pour in all the materials, so try to find something large enough that can hold everything without overflowing once you add water–don’t forget about an area close by where you can construct your brick oven because it will be a pain trying to work with wet cement.
-Shovel -The shovel is needed to mix the water and cement, so make sure you have one on hand before moving forward.
If you don’t plan on digging an outdoor homemade brick oven into the ground, then there’s no need for this tool–you can create what’s known as a slab-style instead: flat and straightforward without all the trenches and curves.
-Wheelbarrow -A wheelbarrow is another beneficial tool that you’ll need when making your homemade outdoor brick oven, especially if your yard isn’t level or compacted properly–this kind of project is very strenuous but well worth it in the end when you get to eat the delicious food that’s been cooking for hours!
-Bucket -This makes it easier to carry all your materials and tools outside without spilling or wrecking other things in the process.
Dig out a hole about 6 inches deep, and make sure it’s more comprehensive than what you need since there will be lots of rocks and dirt involved during construction. -If you want it to be much taller, make sure to dig out an even more giant hole and use lots of gravel/rocks for the base.
TIP: If you want your outdoor brick oven to also double as a smoker, make sure it’s placed near where the wood chips are stored (ideally inside because it’ll prevent any excessive amounts of moisture). Remember that you’ll need separate ventilation pipes for this, which can lead into your main cooking chamber!
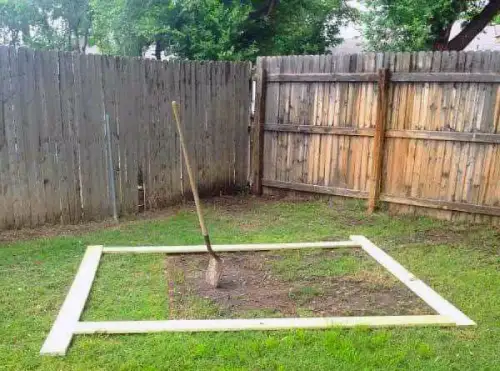
Step 2: The first thing you’ll want to do is decide where your oven will be built and mark out a rough area with either paint, spray chalk (more accessible), or string (works well if there are existing cords attached to stakes/poles).
Don’t forget about burner pipes and drip pan extensions that also need space, so make sure you leave them some room! Now take a quick break before starting on the next step–it can be pretty exhausting, so it’s always best to catch your breath beforehand.
Place some sort of insulation material on both sides if there isn’t one already included with your kit since most outdoor homemade brick ovens will require extra heating during colder seasons due to all the wind. -I used pieces of particle board, but anything natural like hay/straw/leaves would work out just fine.
Step 3: Start digging out your outdoor brick oven once you’re ready.
-This is where the wheelbarrow comes in handy! Using the shovel, mix with water about 50 percent cement to have a wet but sturdy mixture that’s easy to work with so try not to skimp on the mix because it will be much more complicated (and more expensive!) trying to fill any cracks or uneven spots later on.
-Use dirt and rocks as fillers if needed, then flatten everything down by repeatedly squeezing down on the concrete with your shovel handle/foot until it’s level.
-If you’re making an outdoor homemade brick oven that’s more like a simple slab, don’t forget about using rebar or steel mesh around all four sides to prevent cracks and easy breakage.
Add some framing to hold up the brick oven once it’s finished because nothing works without proper support! -I added metal bars on either side, but large branches will also do the trick if you don’t feel like buying extra supplies just for this step.
TIP: If you’re using a piece of hardware cloth, secure it into place before putting in the insulation material/ rock base because otherwise, it’ll get pushed down too far and be almost impossible to separate!
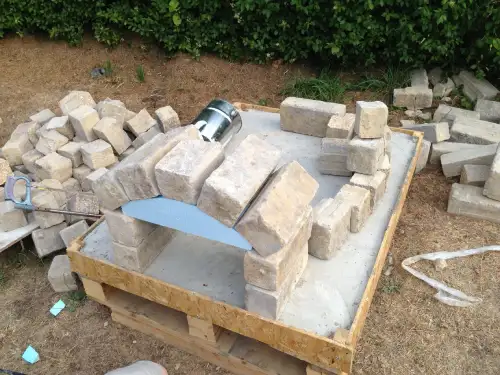
Step 4: Once the area is completely level, start laying down your bricks one by one while trying to keep them uniform in their shape/size; otherwise, it will look messy!
You can also use broken pieces that are flat to fill in any gaps if you don’t have the right-sized bricks on hand–make sure they’re dry before touching anything near the oven.
Place your first layer of rocks around the insulation material, so everything stays together when wet or dry–it should go up at least 6 inches depending on what kind of soil you have available.
If you’re using a cheap brick oven kit, some of the pieces might not fit into place properly, and that’s okay.
TIP: Try to stay away from sharp rocks and pointy branches because they’ll poke holes in your materials and ruin everything if you’re not very careful. I also suggest starting with small stones before filling up every area around the insulation material, which holds together better during construction.
Step 5: Now, here comes the fun part because you get to construct your outdoor brick oven around all these neat little building blocks starting with a large circle for the base, which should be about 12 inches wide.
Use smaller rocks, dirt, or sand mixed as filler inside of this ring while making sure not to leave any significant gaps, so your oven doesn’t have to deal with uneven heating.
Begin building up the second layer by using more rocks, sand/dirt, and some cement mixed for extra strength while ensuring it’s all staying right in place.
Place another layer of rocks on top of everything else before adding a thin strip of concrete along the edge–this will prevent dirt from falling inside when it rains, or there’s too much moisture in the air.
You can see how my edges aren’t finished, but once the clay soil is applied, everything will stick together and become much more substantial.
TIP: Don’t add too much concrete because you’ll want it to be easy to separate so you can dig out the insulation material if it ever gets burnt up from all the heat! I suggest leaving about 4 inches of space between where you started and where you ended–it might take a few days for everything to dry properly, but that’s okay.
Step 6: Once you get to the top of your brick oven, curve the edges inward (if desired) and add a little ledge on top of everything if there isn’t already one there. This will make it easier to grab pots and pans when they’re ready to be taken out!
Add some clay soil around the edge before making another thin strip of concrete on top with a final layer of small stones.
I skipped this step since my brick oven kit came with clay soil already included, but make sure to pack in as many rocks as possible anywhere else around your insulation material (this will add strength when wet).
TIP: If you’re feeling ambitious, try to make it look like a stone oven because if done correctly, it’ll be very similar in terms of quality and heat retention!
Step 7: Unfortunately, I haven’t been able to find any alternative methods for adding a chimney, although you can easily purchase an outdoor stove kit online and simply attach that instead–just don’t forget to add a little piece of hardware cloth in front, so there’s no risk of fire or sparks flying out!
Make sure you have all your pre-made parts before applying the final layer of concrete on top with stones surrounding everything. -You can add sand at this point, but I just used extra gravel since my soil is already highly sandy.
TIP: Let it dry for about three days or more depending on how much moisture is in the air before starting anything–it should feel like hard concrete when properly finished (which means no crumbling apart when removing insulation material)!
Step 8: All that’s left is to create the burner pipes from steel/galvanized piping, add some rebar extensions for your drip pan, and–if you can afford it–buy an outdoor homemade brick oven kit!
This includes a stainless steel box attached to a simple hole cut in one side which houses all the necessary pieces to make it look much better when finished.
Make sure you buy a kit explicitly meant for outdoor use if you want maximum durability; otherwise, everything simply collapses once it gets too cold outside.
TIP: Try not to rush any projects involving concrete because things can quickly get
messy and take much longer than expected if you’re not careful. Start with a small patch to see how it works out before trying larger projects so you don’t waste your time or money on something that’ll eventually have to be fixed/replaced later on.
TIP: If you’re making an outdoor brick oven for baking bread, buy a few clay soil bags instead of cement because it absorbs more moisture, which creates a better-tasting crust! Just remember this tip while going through the rest of the tutorial…
Remove the insulation material and use any remaining rocks to fill in any unwanted holes for a nice rock pathway. Simply add them somewhere else on your property, so it looks more homemade.
I suggest filling in any significant gaps with some dirt and sand from the bottom because there’s no point in having extra rocks around when you can have compost instead!
TIP: If you plan on lighting up your oven soon, try mixing some water into the soil every few days to keep the moisture level high–you want that heat to be locked inside during winter months!
Step 9: Remove any leftover concrete slabs before using some extra clay soil to cover up everything with a final layer of rocks/gravel on top. -You can also add small plants or grass depending on where you live because it’ll make your oven look more alive and homemade.
TIP: Use some spare rocks to decorate around the oven while waiting for warmer days because it’s not easy building an outdoor range without some extra help (it usually takes me about one month or longer, depending on the time of year).
Step 10: Add a lovely steel door complete with all your hinges, locks, latches, metal handle, etc. -I suggest using stainless steel because if you don’t know how to weld that type of material together, then I highly recommend checking YouTube videos on the subject!
If you’re not experienced, get someone who knows what they’re doing to do it for you–it can easily save you over $100+ in repair costs if something is done wrong.
TIP: Use some spare rocks to wrap around the entire oven before doing anything else or simply wait until it’s all curled up with the final layer of concrete!
Step 11: Add your first layer of insulation material on top of everything before adding your next layer of clay soil on top with another thin strip of concrete. -Just make sure to pack in as many stones as possible for added strength and heat retention (it’ll also prevent any significant gaps from forming).
TIP: Try baking small pieces of bread just to test out how good everything works before trying it out on meat because the worst thing you can do is lose all that money you spent building an outdoor oven! Make sure everyone knows this
the stove is not to be touched without supervision because accidents happen, and the last thing you want is for someone to get burned by it!
Step 12: Make another thin strip of concrete on top with a final layer of small stones, and finally, decorate your new outdoor oven with some friendly grass/plants. -You can also add gravel if you like, but I just stuck to using rocks instead!
TIP: Keep an old spray bottle filled with water nearby when baking just in case something flares up or makes any smoke–don’t ever use water as your first option, though, because it’s easy to forget about what you’re doing! If anything starts getting too hot, simply spray some water right on top where it’s hotter than usual.
Step 13: Add your first layer of rocks on top before adding clay soil and another thin strip of concrete to the very top of everything! -I recommend using broken-up pieces/bricks because it’s cheaper than buying more cement (you can always use leftover pieces of bricks to decorate around the oven).
However, if you don’t want to use any bricks or stones, I suggest using small gravel/pebbles instead because there’s no point in having extra bricks lying around when you can easily make a lovely flower bed with them!
TIP: Try not to bake anything on this final layer because it’ll take forever for the oven to cool down once done cooking–just leave all your baking supplies inside until time to take out your food.
STEP 14: Baking time! I highly recommend buying a cheap $10 instant-read thermometer because it takes the guesswork out of everything and makes it easier for everyone to know when things are done cooking.
It’s much easier than wasting money on food only to find out it’s not fully cooked and having to start back from ground zero again.
TIP: Place this instant-read thermometer on one of the two lower racks before adding anything new inside–don’t open up the door right away, or you’ll lose all that heat/incredible temperature before getting a proper reading!
Also, make sure you place this thing close enough where you can see it but at least one away from the oven itself, so it doesn’t melt–you don’t want anything breaking during the middle of baking.
Step 15: Enjoy your outdoor cooking experience! -I prefer just to use regular charcoal because it’s much easier than wood, and it produces enough heat without having too much smoke or even needing any extra lighter fluid to get it started (just be careful because you’ll get some smoke/vapor when adding the lit coals).
BTW, hardwood lump charcoal is NOT needed at all, so don’t waste your money on buying that stuff unless you like using wood chunks throughout the entire process.
TIP: Keep a metal can full of water nearby during the baking time in case things start smoking up more than usual which means you added too much wood or it’s just too hot inside your oven for some reason. -Carry it outside and just dump the water right onto the flames/coals if this happens but don’t pour too much, or you might have to start back from zero because nothing will be cooking at all after dumping the water!
STEP 16: More baking fun! After cooking something, leave the door open so it can dry up properly before putting anything else inside–you never know what problems might come up until everything is fully cooked first.
I noticed that my last batch of food didn’t cook nearly as well as before when I kept closing up the door by accident whenever I wasn’t looking (that’s why it’s essential to keep an eye on things once in a while).
TIP: Be sure to read the instruction manual before using your oven for the first time–it always helps to know what can happen and how to fix it.
Step 17: Cook something else! -It’s that easy just as long as you follow all the rules and don’t try anything stupid like adding too much wood/charcoal or putting things inside before it’s thoroughly cooled off–nothing should catch fire if you don’t do any of those things, so baking is safe enough for even young kids to play around with (as long as you keep an eye on them).
TIP: Never leave children alone near a cooking appliance because they never know what might go wrong unless we tell them proper safety rules first!
Step 18: Your oven should last for many years after building it, so it would be wise to save the instruction manual just in case you need to fix/replace anything down the road.
That’s why it is also recommended always to keep an extra set of screws, bolts, hinges, and maybe even some replacement parts just in case you can’t find any replacements at your local hardware store (plastic pieces are primarily known for breaking easily, but they’re not necessary to use either).
TIP: Nothing will ever rust if appropriately coated, so don’t worry about that happening unless pure salt or bleach is applied directly onto metal–then all bets are off because it’ll probably ruin everything inside.
Step 19: Keep checking back once in a while to see how much baking experience we have after trying out a few other recipes! -I do plan on trying out a few more cookbooks and even posting pictures of the finished product, but I’m not that creative, so it might be a while before it’s all done.
TIP: You should always give away any extra food you make to friends/family who doesn’t live nearby because there’s no sense in keeping too much frozen stuff for too long unless you eat everything within weeks or months–any longer than that and your oven will lose some quality overall.
Where to buy the materials for an outdoor pizza oven?
Materials for this project are easy to find just about anywhere, even if you want to keep things as cheap as possible. -My list of supplies included raw materials because I was planning on learning how everything worked by myself, so don’t expect it all to be the same.
I’m probably using twice as much wood compared to most other ovens. Still, my design is open source, so everyone’s oven should work fine with whatever you have available.
DIY tips and tricks for building a better, more durable, and easier-to-clean-out backyard pizza oven
TIP: Keep all metal/bronze pieces coated with Vaseline or WD-40 before you start working on the oven itself so any rust can be easily washed away after construction is finished–wipe it down once every few months to keep things looking brand new.
Step 1: Clean out your oven. -Don’t touch anything inside until its utterly fabulous off first because burns will happen if you don’t keep an eye on whats going on inside (if possible, wait about 20 minutes), and never use water to douse the flames as soon as they appear because it could create a smoke hazard from everything burning up at once.
TIP: Water creates steam when heated up–don’t ask me why but I read it on some website somewhere, so it’s probably true!
Step 2: Remove all the ashes and gently clean out any remaining pieces that didn’t burn off with a stiff brush or stick–coating everything with black ash isn’t good for your health either, so wear a dust mask while cleaning anything.
Don’t use water to wash down the oven again until you’ve finished building it because water creates steam when heated up…yeah, I know there are more important things to remember, but don’t ask me how I know this stuff because my dad told me so years ago.
TIP: Don’t expect everyone to believe in a fire unless they see it for themselves, which is why most people who have never tried wood before will have doubts about how
powerful it can be, so always have some extra wood on hand if anyone shows up early for a gathering.
Step 3: Once everything is finished being cleaned out, its time to remove the chimney and start prepping the floor by laying down some tiles/stones of your choice–be sure not to go overboard with how many you put because too much will make it hard to maneuver inside once the oven has been built around it.
NOTE: If you’re using cinder blocks instead of stones, fill every other block with sand before putting them over top of any kind of wooden support, or else water might get trapped underneath during rainstorms.
Conclusion how to build an outdoor pizza oven
The design of your outdoor pizza oven will depend on what you want it to do. Remember that the type of wood, clay pots, or bricks used for insulation and cooking surface types all affect how fast heat will be transferred into your pizzas.
You can also cook other things besides pizza-like bread, meats, vegetables and more! Finally, don’t forget about adding a chimney so that smoke can escape – this helps prevent any unwanted odors from coming out.
These are just some ideas for designing an excellent outdoor pizza oven with minimal effort! We hope our article enabled answer any questions you may have had about building one yourself.


![How To Keep Pizza Warm In Oven? [ 12 Best Ways ]](https://plazapizzaandgrill.com/wp-content/uploads/2022/01/How-To-Keep-Pizza-Warm-In-Oven-438x246.webp "How To Keep Pizza Warm In Oven? [ 12 Best Ways ]")
